Friday 27 July 2012

Hola again!

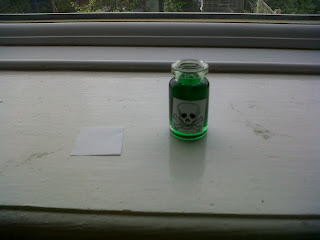
Here's an apology to anyone who ever reads this: It's been a few months and i've seriously neglected my blog. But i'm back with a cute tutorial, that happens to be for my little sisters birthday present. It's a tiny bottle of (Harmless) poison!


Here it is!

All you need are these few things:
- Green food dye
- Clear glue (Elmers school glue if you're american, poundland multi pack glue if you're british)
- A little bottle (I'm using any and every excuse to make things in little bottles!)
- Toothpick
- Headpin
- Superglue
- Round nosed pliers
- Wirecutters
- Little scrap of paper and scissors (Or a template for a skull which you can get here)


Here you go! These are the things that you need!


Righty-ho, you'll need to get your little bottle, and clean it out first if it's been used, if not you'll be fine. Pour some of your clear glue into the little bottle, and pour a few drops of the food colouring into it. Swirl it around with your toothpick and then fill the bottle to the top with glue. Give it one last swirl before you put the lid on.


Get your head pin and stab it through the bottom of the cork, so that theres a long bit through to the top. Twist the rest of the wire into an eye and close the gap. Put this to one side.


Get a little bit of paper and draw a skull on it (Get one here) Either freehand it, or steal mine. Use a little bit of the clear glue to stick it onto the bottle.


Now get your top and put some superglue on the bottom edge, then put it into the bottle and leave it to dry. Put a jump ring through the eye pin and some chain or some sort of hanging device and you've got yourself a very nice lethal looking necklace!

Hope you've enjoyed my comeback tutorial! If anyone makes it, email me a picture at bethany.price94@hotmail.co.uk!


Tuesday 15 May 2012

Face the Day

Ever wake up in a good mood, and realize how crappy the weather is, the suddenly you're all sad? Well that's me today. This week it was nice and sunny (Got sunburnt climbing a mountain!) but then it got all gloomy and rainy. So i decided to find myself an edible cookie dough recipe just because i didn't have the time to cook it and i just needed something really sweet to get me through the day.

I don't think the picture does it justice to be honest with you, so you'll just have to try it out yourself.


I used this recipe as a base and sort of changed up the quantities a little, and it still tastes all good just so long as you make sure that the three main ingredients are all equal.

Good luck with your cookie dough and your day!
Ciao for now!

Monday 23 April 2012

Lavender Beauties

I long ago decided that my closet needed a new smell, so i decided to use up the bag full of dried lavender that i've had lying around forever. It took me a while, but i seem to have successfully found a way to make my wardrobe smell nice and still look good.


Some pretties for you

So i've been majourly checking out the 'Cupcakes and Cashmere' blog at the moment and i love all of the cute Walnut Papiere stationery (Hint: Click the link and go buy them out of business). I decided that i'd make some of my own because i absolutely love Emily's cute little chevrons and i'd like some little notecards to go with my own little mini-business. So here's a present. You can have some free pretties. There's two A5 notecards to a sheet, and there's also a page full off matching ribbons (15 to be exact) to accessorize your envelopes to match. For the best effect print the notecards onto medium weight card, and the ribbons onto thin paper and affix them to your desired envelope.


Thursday 12 April 2012

Bakers Twine

The other day whilst I was browsing in IKEA I came across some brown paper wrapping paper. And as i'm a person of little pleasures i completely wet myself at the sight of it. No, i'm not scared of paper, i've been looking for some everywhere for a looong time and couldn't find any for love nor money (Silly saying, i feel it though). So after purchasing myself some brown paper to prettify myself some presents (Boyfriend and best friend no more will you find yourself with cheesy paper patterned with kitties and puppies, but you will find yourself with a very sophisticated box of awesome) i realized that i hadn't got anything to wrap it with, which sounds silly because you wrap with paper... Right? But i mean ribbony things. Normal ribbon looks way too boring so i thought of getting some bakers twine. But woah nelly it wasn't to be. It's way expensive with all the shipping and whatnot so i was a little against that. Then it hit me (Quite literally i dropped a ball of cotton on my foot) i'll make my own! So here's a little how to on making bakers twine. It's literally the easiest thing in the world.

Supplies:
- Cutting mat
- Sharpie of choice
- Scissors
- Crotcheting cotton or wool or something that's white
- Some card
- A little card bobbon that i made myself or you can make yourself
- Ruler


Simples! *Squeak*

Thursday 29 March 2012

MockingJay Necklace

I know, i'm awesome you don't have to tell me. What's that? I'm not awesome? Well i'm going to hunt you down and kick your ass prove you wrong. I recently started reading the hunger games (Don't mean to be a hipster, but i'd heard of it way before the movie came out. Although that does look amazing!) and i fell in love with the cover. And the book, but mainly the cover. I love the idea of the MockingJay so i decided to make my own brooch/necklace. I haven't decided which yet, but i think i might make it both! In the course of writing this DIY out, i decided to make it into both.

Ingredients:
- Shrinky Dink
- Hunger Games book or a template
- An X-Acto knife
- Paint/Nail Varnish
- 2 Pairs of pliers
- Chain (If you want a necklace)
- Brooch Back (If you want a brooch)
- Pencil
- Jump Ring (If you want a necklace)


Jumping on the bandwagon'

Interchangeable Necklaces

I love to match my jewelerry to my outfit. I thought this necklace was cute, so i then though, why not make more of them? Make them interchangeable! I made three different colours, pink, blue and green.

Ingredients:
- Chain
- Fimo (Three or more colours)
- Round object to draw around or cut with
- Two pairs of pliers
- Three jump rings (Or however many peices you've made)
- Push pin
- Lobster clasps (Optional)